How to Use Canva to Collaborate and Create Amazing Graphic Design
Humans are visual creatures; you need good graphics to keep people interested. Thankfully, graphic design is becoming more accessible to everyone, even those who have no prior knowledge.
Enter Canva, the free online design creator that you can use to create (and collaborate on!) beautiful designs for your website, social media accounts, presentations, and more.
Are you wondering how to use Canva and unlock its potential? Then keep reading. I'll show you how to familiarize yourself with this amazing and useful tool.
What is Canva?

First off: what is Canva exactly?
Canva is a graphic design platform that lets you create all sorts of graphics, such as posters, social media graphics, and more. What's great about it is it's easy to use and comes with templates so you don't have to pour hours into creating things from scratch.
In addition, Canva is available on both your browser and mobile phone, which means you can even create graphics on the fly if need be! This can be especially helpful if you update your social media accounts in real-time and need some eye-catching visuals.
Canva is free to use, which makes it extremely accessible to everyone. You can try it out for free and experiment with its features. And if you like them, you can always upgrade to Canva Pro, which unlocks even more features.
The Layout

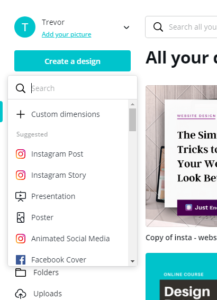
The first thing you should do is get familiar with the layout.
Once you've logged in, you'll see the Dashboard. There's a menu on the left side where you'll find things like the templates, photos, apps, and all your saved designs.
There's also a button labeled "Create a design" underneath your name on the top. A drop box will appear after clicking, and you can use the Search function to find what you're creating. For instance, you can select "Pinterest Pin" or "Instagram graphic."
After selecting what you want to create, this takes you to the editor. Here, you can edit the design. choose your own custom dimensions or choose from preset ones for things like posters, logos, videos, presentations, and more.
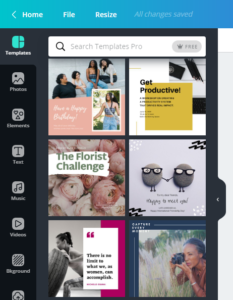
Within the editor, there's a Search function. All you have to do is click on the search bar, then type in whatever it is you're looking for, such as a "Pinterest Pin" design or a particular photo or graphic.
If you want to use a template, there are two ways to do so. First, you can browse them in the editor by category. Select the one you want and it'll pop up in the editor.
Or you can go back to the Dashboard and browse the templates from there. Once you select the one you like, you can then start a new design in the editor.
Getting Started
If you're completely new to web design, then you'll want to make things easy on yourself, at least for the beginning. After clicking on "Create a design," you can choose one of the preset dimensions for whatever it is you're creating.
It's super convenient, as you'll know how large to make graphics for certain platforms, such as Twitter or Pinterest. And if you're unfamiliar with design, the templates that are created for various applications (such as presentations or Instagram) can help you out in a pinch.
After you get familiar with Canva, feel free to experiment with custom dimensions to truly make your graphics your own.
Once you've clicked on a preset dimension (such as "announcement"), Canva will take you to a new page that displays all the relevant templates. They've neatly gathered everything and placed them into different categories (such as "wedding announcement," "birth announcement," "engagement announcement," and more).
Take a look to see which templates speak to you; remember that you can play around with it and customize it, so it'll have your flair on it by the time you're done.
Creating Your Graphics

Once you've picked a template, this is where the fun begins. While there are tons of features available to use, make sure you always keep your branding in mind to keep everything consistent.
If there are text boxes on the template you've chosen, you can double-click on them to change the words inside. You can even adjust the font and font size to your liking.
Want to add more text boxes? Just click on "Text" on the menu. This will bring up choices like headings, subheadings, and body text. Canva even has a section for font combinations; these are preset text graphics that you can customize on your own.
Colors

Not happy with the template colors? No problem.
Simply click on an element in the design (like a text or shape), and you'll be able to change the colors on the top left-hand side. You can choose from either the default hues or create a new color.
A great feature with the free account is setting your brand colors. These are then available for every design you create. This ensures there is strong, consistent branding on anything you produce.
Images

As you'll see, there are preselected images on the templates. If you're not happy with the placements, you can double-click on those and drag them until you're satisfied with the parts displayed on the page.
You can even swap them out with other images from Canva's library of free (or paid) images. Their stock images are very affordable, with each costing just around $1 each. So all you have to do is type in a keyword and you'll generate thousands of results.
If you'd rather use your own images, that's possible as well. All you have to do is click on "Uploads" in the menu, then upload either your photos or videos.
Should you decide you don't want to use any of these images, just click on it, then press the trash can icon on the very top right of your screen. You can also put effects on, flip, crop, duplicate, or adjust the transparency on your images.
Another convenient feature Canva has is the positioning tool. This helps you align elements to others in the design. So for example, you can ensure a group of photos line up on the left side perfectly.
Videos

To make things super eye-catching, you might want to add some videos. This can easily be done by clicking on "Videos" on the menu.
Canva has a ton of stock videos you can use, such as recordings of animals or aerial shots of cities and the countryside. As we mentioned before, you can also upload your own videos, so you can do that as well. If you're a vlogger, this can be an excellent way to give teasers of your upcoming videos.
Background

Maybe you don't want to use panels of images as your graphic's background. In that case, you can opt for a solid pattern instead.
Canva has a section called "Background" where you can scroll through lots of preset images, such as wood paneling, clouds in the sky, or sand. Or if you want something very simple, you can just select a color you like and fill the graphic's background with that shade.
Elements

Once you've gotten everything down, you can add some elements to spice things up.
For example, you can put little stickers and icons around your graphics. Search shapes and icon names to find exactly what you need. But be careful not to go overboard, as this may become too distracting to the viewer.
If you're creating something like an infographic, you can also add charts like bar and pie graphs to your image. Just click on the type you want, and Canva will automatically generate the results after you've entered the relevant information.
Creating More Than One Page

In most cases, one graphic is enough for whatever you're doing. But in other situations (such as presentations), you'll need to create more than one page.
When you're ready to start creating more pages in your project, click on the button at the bottom of the page that says "+ Add a new page." This will give you something new to work with; it'll be blank, so you can either use that or select another template to use.
If you want to refer to your previous pages, or you want to alter anything on them, all you have to do is scroll up and down to flip between them.
Saving Your Project

Canva is amazing because it autosaves what you're doing. So if at any time you accidentally click off of your project, all you have to do is go to the homepage, select "All your designs," and you'll find everything you were working on in there.
Once you feel like your graphics are ready, you can click on the top right button that says something like "Publish" or "Print cards"; the exact wording will depend on what kind of project you've selected. To the left of the button is a button to download your project in case you want to save it to your computer.
If you have other team members, you can also use the "Share" button to the left of these buttons.
Know How to Use Canva to Its Full Potential
Now that you've read this article, you should have basic knowledge of how to use Canva.
But often, people are visual learners, and while reading articles can be helpful, it still may not be enough for someone to fully grasp how to use this software. If you're one of these people, then you'll be glad to know that there are many online tutorials available that can help walk you through crucial steps so you can fully understand how to use Canva.
For instance, I have a completely free Canva course right here on Just Enough Design! I'll teach you how to create beautiful work for things like presentations, websites, social media, and more. The best thing, you don't need any design training to understand this course.
Check out my book "An Ugly Design Career" all about how to create an unbreakable design career.
